Sunday, December 29, 2013

Off The Rails Scrapbooking - Sketch With Color Challenge

Hi, friends. Its a new challenge again at Off The Rails Scrapbooking. We are doing a sketch with color. Pls hop over here for the details. And here's my take on the challenge.

Lifetime Is... Not Enough


I distressed the edges of the paper, adhered the lace and the relevant patterned papers. Then sprayed color mists over them.


I love this chipboard phrases. Added glitter to the word "Love". Here you can see some gauze peeking through behind. Love the effect. I can't help but add in some mixed media elements in my layouts nowadays.


These Prima flowers are just the right finishing touch to the layout. I added leaves behind them.


I sanded the edges of the sepia photo to create a aged look. Please do try this. Its a very nice effect. Don't be afraid to distress your photos.


For the top and bottom of layout, I added these cut-outs from Prima journal cards.


Love how this layout turns out. I seldom use this color scheme for my projects. And its such a simple and fast one. Hope you will love it.

Do hop over to Off The Rails Scrapbooking to join in the challenge. Have fun crafting... And Happy New Year to all!!

Thanks for dropping by. 

Friday, December 20, 2013

Christmas Houses Inspiration

Hi, friends. Christmas is around the corner. I'm sure all of us are busy as bees, preparing goodies, deco, gifts and some organising parties.For some inspiration on home deco, I want to share this project. I made these as gifts for my dear dear friends. I hope it can spread some Christmas spirit and love to them. This project is also featured in Off The Rails Scrapbooking Blog. Do join us for the second challenge over here and win the delicious Dusty Attic chipboard shapes. Boy.. I wish I can join and win these goodies.... :P

Light Up Christmas Houses


4 Chritsmas Houses made with Silhouette Cameo. Added buttons and glitter on the roof. And adhered onto felt-covered chipboard bases.


I layered 3 pcs of wreaths to give a more dimensional effect and added glitter. The pathway is done by glueing little pebbles (already pink when I bought from Daiso) with glossy accent.


Love this tree. Cut with Silhouette Cameo too. Then I added glitter and Viva liquid pearl (to mimic snow since I had no snow-like stuff).


I added LED candle light into the house. Oh forgot to add, I glued a piece of tracing paper (you can use vellum too) unto the inside of the house cut-out (windows n door area). Love how the lights brighten up the whole house.


The roof can be removed to put the LED candle in. The buttons on the roof gave the shape and weight (so the roof wont go out of shape easily). Its a good way to use up buttons. I'm sure all of us got tons of buttons. I had to resist the urge to buy more buttons to refill back.

Well, I hope you like my projects. Have a blessed Christmas and Happy New Year!!

Thanks for dropping by.

Saturday, November 30, 2013

Off The Rails Scrapbooking Challenge No. 1 - Acetate

Hello, friends. Are you excited?? Finally the time is here for our first challenge at Off The Rails Scrapbooking. And the first challenge is to use Acetate in your projects. Do join in the fun and stand a chance to win the prize from our first sponsor, Boys Rule Kits.

And here's my DT take:

Mixed Media Project Life Cards

"An Eternity"

"An Eternity" Project Life Card

"Two Hearts"

"Two Hearts" Project Life Card

I used Canson Mixed Media paper for the base and Faber Castell Gelatos for coloring the background. I rubbed different colors of gelatos randomly and then use a wet tissue to blend them together. I misted Mr Huey's white color mist to add the specks unto the cards. Then I add doodling. I love that the script acetate (Hambly Overlay) completes the background so easily without having to stamp or add in more script writings myself. Finally I journal on Canson Mixed Media paper, cut them out and added colors and doodling before I adhered them on the cards. This is such a simple technique and a fast one for my Mixed Media fix. Its so fun....

So do come over to join us in the Acetate Challenge at Off The Rails Scrapbooking. Have tons of fun.

Thanks for dropping by. See u soon.

Monday, November 18, 2013

Blogloving

Follow my blog with Bloglovin


Off The Rails Scrapbooking Challenge Blog

Hi, friends. Been busy busy.... And today I have something exciting to share.

I'm very honored and excited to be part of the Design Team of a new blog challenge, Off The Rails Scrapbooking. Do head over to have a look and spread the news.

The first challenge will be announced on 29th November. Do follow the blog and join in the fun. Woo... I can't wait for the challenge to start.

Have fun. And thanks for dropping by.

Monday, September 30, 2013

"Altered Book" NLB Project

Hi, friends. This past month had been a busy period for me. One order after another. One sickness after another. Grandma being hospitalised too for 2 weeks. But thank God she's ok and discharged now.

Today I want to share a past project. Its actually done last year. I attended a "Altered Book" workshop organised by National Library Board last year. After the workshop the instructor invited us to take part in this "Altered Book" project with several themes. I decided to join in the theme of  "Home". Each participant is to altered a double page of hard cover gessoed story book and after done, to pass on to another participant. The finished books will be on exhibit in Bishan Library this year around June. Sorry I took so long to blog about this. :P

"Altered Book" - Heavenly Home...

"Altered Book" NLB Project

I made this page with regards to my belief, my heavenly home. I painted the background with acrylic paints, sponged/dabbed some white paint over stencil. Added the clouds, house, mixed media girl.

I used Faber Castell Big Brush Pens and gelatos for the girl and clouds. My journaling is done around the clouds.

Below are some close-ups:

"Altered Book" NLB Project close-up

"Altered Book" NLB Project close-up

"Altered Book" NLB Project close-up

"Altered Book" NLB Project close-up

 And here's the exhibit at Bishan Library.


I love mixed media. I love the no-rules part of it. Though I would love to do the messy kind of art, I find that I tend to be quite neat and not messy at all... hmmm.... I think I'm still not that "free" in my expression. Hmm.... or is that considered as my style? So I got to work on mixed media more and explore about myself through this art venture. I hope you will too..

Have fun. Thanks for visiting my blog.

Tuesday, September 10, 2013

Prima Inspired Album

Hello!!!! This week is school holiday in Singapore. So needless to say, I will be more busy than ever as my girl is at home the entire week and I need to think of programs for her. Well, good that my son is in childcare. Phew!! Ha ha...

Today I want to share another past project. Its a mini album inspired by Prima Design Team's video tutorial. Well, if you have been to Prima Marketing's blog and UStream, I'm sure this project won't be a surprise to you. It's basically like a replica!! But then I love the finished product though it's "copied".

"Flower Pot" Album
Prima Inspired Album, cover

Prima Inspired Album, pg 1

Following the same technique in Prima's blog, I used Faber Castell Gelatoes to color the canvas. Then I added the ribbon, embellishments, flowers. A tag was added behind the canvas cover so as to provide the backing for the flowers. I used Prima's doll tags for this. And the journal tags in this album are printables from Prima's Friday Freebies at their facebook page.

Prima Inspired Album, pg 2

For the inserts, I used Prima's doll tags. In this page, I created my own digital journal tag with some of the digital files I bought, using Photoshop software. Digital images are a great money-saving and space-saving crafting supply. Here are the rest of the pages, done using digital images as well as Prima's papers.

Prima Inspired Album, pg 3

Prima Inspired Album, pg 4

Prima Inspired Album, pg 5

Prima Inspired Album, pg 6

And here's the back of the canvas album:

Prima Inspired Album, back

Its such a lovely and fun project. I hope you are encouraged to try. If you want to view the video tutorial, do drop by Prima's blog. Have fun!!

Thanks for visiting.

Friday, September 6, 2013

"Poppies" Mixed Media Canvas

Hi friends. August is a busy busy month for me. Because the first Friday of September is Teacher's Day. So I had quite alot of orders the past month. So I haven't had the time to do my own crafting. And boy, I missed crafting. Its a different kind of feeling when you are crafting for orders and crafting for own pleasure. And I missed my mixed media fun!!!! Ironically, today I'm sharing a mixed media project I made few months back.

I actually take a finished canvas and altered it. I think I haven't share that original piece too. Well, I made a poppies canvas for a local scrapbooking challenge facebook group. After that, I kept looking at it and was not pleased with the look. So I went ahead and altered it again.

"Poppies" Canvas

This is the original piece. Ugly, right?
Poppies canvas

I'm not happy with this piece as I think its too busy!!! The poppies completely took the limelight from the phrase. And I don't like the orientation of the wordings too... Well, who made this? Me!! And when? In the middle of the night!!! Ha ha....

So I went and alter it to this:

Mixed Media Canvas, "Poppies"

It's still not the perfect piece. Too much space..ha ha... But it will do for now. At least I love the poppies. I painted a mixture of white acrylic paint and glass bead gel over the whole canvas, misted it and added some turquoise paint around the edges. I stamped the poppies with Donna Downey foam stamp and added some black beads as the flower center. Hmmm....should I add the leaves and doodle some borders?? hmm......

Here's some close ups:

Mixed Media Canvas, "Poppies"

Mixed Media Canvas, "Poppies"

I hope you get inspired to alter any art piece that you are not happy with. Instead of throwing away, alter it! Till you are pleased!! Art is always evolving!! I got more past projects to share. Do keep a lookout.

Thanks for dropping by.


Tuesday, September 3, 2013

Busy Busy

Hi everyone. Sorry for the long break in blogging. Been very very busy. With my art class. I started attending painting and sketching class. Its fun but kept me busy too. And surely this year is filled with sickness too. Been down with throat inflammation on and off the past few months. I just recovered from the last "attack". Doctor says its my allergy and sensitive nose that trigger my sinusitis and led to throat inflammation. Oh boy... I need to take more vegetables and fruits!!!! And pray hard that the haze from Indonesia forest fire won't come back again. A terrible haze!!! Triggered all my allergies and cause burning sensation in my nose!!!! Air pollution, please go away!!! Hee...

Enough ranting!! Today I want to share a project I made few months back. I love 3D projects. So I made 2 teapot sets, one for myself and one for my girl to play using Silhouette Cameo and SVG Cuts design.

"Vintage Teapot"

Vintage Teapot set

I used Pink Paislee paper collection for the teapot and cup. Love how vintage they are. Added Prima flowers and blings. This is such a pretty digital design file by SVG Cuts. Lovely, aren't they!!

Here's some close up:
Close up fo Vintage Teapot Set

Close up of lid of Vintage Teapot

I added some glitter onto the flowers to sparkle them up.  After seeing my finished project, my sweet girl requested to have a pink set for her. It took me some time to do another one for her. And I made a cupcake box for her as well. And I used her favourite fruit patterned paper, strawberry!!

Strawberry Tea Pot and cupcake

I didn't put any flowers or blings for her teapot set as I know she want it plain and functional so she can play together with her food toys. Well, after this, she requested for other food!!! Oh boy!!! ha ha.... I hope I can make a food stall for her soon. Just like what I saw at IKEA. I know I can simply buy the food stall but then its more fun to make one. Agree?? hee...

Well, thats it for today's post. I try to blog more often. Hope my followers will keep following me. hee... Do drop by and comment on my 5th blog candy post here to win some goodies.

Thanks for visiting.

Wednesday, May 15, 2013

"Love With The Heart" Layout

Hi hi, everyone. Lately I have been pretty busy even though I have no more design team commitments. So I'm sorry that I have not been active much in blogging.

Today I want to share another wedding layout. I made this layout for a local interest group challenge. The challenge is to scraplift from a layout provided. Can be by colours or sketch layout etc.

Here's my take:

"Love" layout

I scraplifted the sketch layout design. I wanted to create a simpler look with little bit of layering. I sprayed mists on Pink Paislee Mistables papers. Cut the kraft frame with Silhouette Cameo, punched the white lacey strip and diecut the doilies with Spellbinders die. I also used Dusty Attic chipboards and Want2Scrap chipboard.

I love this particular photo. Me and my hubby looking down at the baby's breath flowers!! And I love the quote, "Love looks not with the eyes but with the heart!". Its such a perfect quote for this photo!!!

"Love" layout

"Love" layout

"Love" layout

For the chipboards, I painted with a mixture of gesso, pink acrylic paint and glass bead gel.

Recent months, I started to join back the local ATC Swap group!! So I will be sharing about the ATCs that I have made so far. Do stay tune. And do join in my 5th Blog Candy here.

Thank you for visiting!! See you soon!!


Wednesday, April 24, 2013

"Forever" Layout

Hello!! How's your day?? Me thankful for each and every day that I can get to craft!! :)

Today I want to share about a wedding layout that I made. Its way overdue!!! I'm already married for 9 years!!! Oh my!!! Its ok. Its slowly coming up!! :P

"Forever" Layout

"Forever" layout

I love this Prima Divine collection!!! So shabby chic and beautiful!! It is perfect to portray the meaning of forever!!! hee.. After I adhered all the papers down, I misted abit of Mr Heuy's white mist at the background. I painted the chipboards with texture paste and inked over with Donna Salazar Mixed Media Inx.

"Forever" layout

I love this quote!! I popped it up with foam tape. Added some small pearls randomly too.

"Forever" layout

"Forever" layout

Close up of chipboards.

Hope you are inspired by this layout. It doesn't matter how old the photos are and how long you have stopped scrapping these old photos. The important thing is to start now. :)

I got one more wedding layout to share. Do stay tune. And do join in my blog candy.
Have fun.

Sunday, April 21, 2013

Acrylic Painting Class

Hi hi!!! Recently I attended a acrylic painting class at a local art studio. Its a fun class yet abit stressful... ha ha... because its the first time that I'm painting a big canvas, 18 inch by 24 inch!! So after each session, my arms ache!!! Oh my!! Sign of not enough exercise!!!

Here's the first painting that I have done. Took me a few lessons to get it done!!! Alot of texturing to do on the cliffs and rocks. I'm not very happy with the clouds though. Might amend abit!!!

My acrylic seascape painting

Below is the actual photo that I'm "copying"!!!

My acrylic seascape painting

These cliffs took me 1.5 lessons to get it done and that's 3.75 hours!!! oh my!!! I'm too slow!!

My acrylic seascape painting

This rock is my favourite!! Hee!!!

For my next painting, I think I want to paint a landscape of autumn forest!! I loved trees and the autumn colours are just too pretty and invokes peace and tranquility in me. Just hope that while painting, I can be at peace and not get stressed out by the details!!! ha ha...

Thanks for visiting. Have a fun week!!

Friday, April 19, 2013

Altered Book Box and Mini Album

Hello!! how's your week?? Me very very busy!!! Alot of meet ups, alot of crafting, alot of baking!!! Yap!!! I started to bake recently after a long long break!!! Yesterday, I baked 2 loafs of strawberry breads. Hmm.... but the texture are more like cake!! ha ha... But its tasty!!

Today I want to share about a book box that I made awhile back in February!! I love this box!!! Hope I can get more of this box to alter!!! Anyone any idea where can I buy?? I got it from a friend.

"Treasure" Book Box and Mini Album

Book box

I painted it with a coat of turquoise acrylic paint, followed by a coat of crackle medium and a final coat of white acrylic paint. Then I misted it with glimmer mists. Added the mixture of glass bead gel and texture paste over a brick stencil at the top and bottom edge of cover. I love to use chipboards. Hence the clock and gears chipboards are added, painted over with texture paste. The zipper head from Prima acts as the handle to open the box.

Book Box

Here's the side of the box. Also added a chipboard shape.

Book box

The inside of the box. The mini album inside is done with the same technique as the box. Each pages are made using chipboards and painted same way. I haven't add any photos inside so I will share again after I add.

I hope you enjoy my project. More posts on other projects are coming up. Do keep a lookout too.

Thanks for dropping by!!

Thursday, April 18, 2013

My 100th Follower Blog Candy!!

Hi. As promised, I will be giving out blog candy for my next tier of 20 followers. For this 100th followers mark, I will be giving out 2 candies!! Yap!! 2 candies!! :D

For the 5th Blog Candy, here's what you have to do:
1) Become a follower of my blog
2) Put a link on your blog linking to mine. You can use the blog candy picture as the icon.
3) Please leave a comment below this post.
4) For existing followers, you are entitled to join in too. Just leave a comment below this post.
5) Once it reach 80 followers, I will draw out a winner.

All are welcome to join.I ship internationally.

And here's the candies:


These 2 bags of candies are almost similar. Here's the content:

  • 2 stamps
  • 1 pack of blings
  • Assorted ribbons and trims
  • Assorted flowers
  • 4 pcs of paper straws (can be used as dowel for flowers or wands)
  • 1 roll of washi tape
  • 2 pcs of mushrooms (for altered art)
  • Some metal charms
  • a mini glass bottle of 4mm flat swaroski crystals (20pcs inside)
  • 1 small pack of twines
Well, I hope you like the candies. So do join in!! 

Thanks for visiting!!

I'm Back!!!!!

Hi hi!! So so sorry for MIA!!! For past one month, my blog been plagued by lots of spam comments!!! Was worried it might be virus!!!! So I dare not post anything fearing that it might affect those who visit my blog. Well, I'm not a IT savvy person. So was trying to figure out how to solve this problem. Finally thought of using word verification to block all the spam comments!!! After trying out for afew weeks, it work!! Now no more spams!!! Phew!!! And so I'm back!! :)

First post that I want to do is about my blog candy, followed by other projects that I have done these past weeks. Do keep a lookout!!

Thanks for visiting.

Sunday, March 10, 2013

My Little Shoebox Cloud Passport Case

Hi hi. How have everyone been??? I had a busy week. My girl's ballet exam is coming soon and her ballet teacher added extra practises (5 days a week). Oh my!! That's a lot, considering that her school tests are within these 2 weeks too. So me rather busy coaching her in her studies and bringing her to and fro practises.

Well, today I want to share about the Cloud Passport Case, one of My Little Shoebox new lifestyle product.


I love this cloud background pattern. It has always been my favourite pattern. And it really gives me a holiday mood.


The size, about 6 by 9 inches, for this passport case is just perfect for me.


I can put my passport, travel journal or art journal, pen, inkpad and stamps inside.And there's still space for stickers, lip balm and other stuff. Other than being just a passport case, I can also use it as a hand carry bag for shopping and outings. The PVC coating is a plus too. Living in a tropical country where rain is quite frequent, having a waterproof case is just right for protecting my documents. I really love this case and I can't wait to bring it with me for holiday trips.

So do go here to get this lovely passport case and other lifestyle products. Have fun shopping!!

Thanks for dropping by.

Saturday, February 16, 2013

Fabulous Friday Challenge - Be Bold

Hi, friends. We at Frosted Designs is challenging you to use Bold Colours and  Patterns for your projects. This is my last assignment for Frosted Designs. Sad to leave this heartwarming, fun and talented team!!! But I think I need a break to think where I want to go and achieve in my crafting journey. And of course, I won't give up crafting!!! Its in my blood!!!. :)

"You Make Life Bright" Card

I made this card for a dear dear friend's birthday. I hope she love it.

"You Make Life Bright" Card

I misted all the Prima resist canvas with Dylusions mists. And adhered them to a white cardstock. Love the contrasting colors. Also doodle around the cover.

I hope you will join us for this challenge at Frosted Designs. Have a fun time..

Thanks for dropping by.

Wednesday, February 13, 2013

Designer Spotlight and Blog Candy Winner!!

Hi hi, friends. I'm back for a while!!! Chinese New Year is a busy season for all Chinese. For the part few days, I have been visiting all my family and relatives and wishing them "Happy New Year". Its a tiring thing but important!! Got more visitation for the next 2 weekends.

But I managed to squeeze out some time in between Reunion Lunch and Dinner and between visitations to create an altered art project. Will share more in next few days.  In the meantime, just want to share that Frosted Designs is having a Designer Spotlight feature about me this week. Do hop over to have a look and get to know me better.

WOW!!! My blog have reached 81 followers!!! So its time to draw the winner for my 4th blog candy.

and the winner is #18, La Vikinga

Hi; I seem to be number 80! Can I participate, too, then?

Greetings from Sweden,

Charlotta / La Vikinga"


Congrats!!! And I have decided to have another winner who will get a surprise gift (ummm.... surprise because I haven't gather them together yet. :P) . So who's going to be the winner for the surprise gift?? Here goes:

Its #1, Susan Martin!!! Wow... today's winner is the last and the first!! ha ha..

For both winners, please email me your address at ctlove2scrap@gmail.com.

Thanks to all my followers!! Keep a lookout for the next 20 followers blog candy next week. Have fun crafting!!!

Thanks for dropping by!!

Saturday, February 2, 2013

Frosted Designs Fabulous Friday Challenge - Love+Heart

Hi, friends. February is a month of celebration and love!!! First, there's Chinese New Year, followed by Valentine's Day. Here at Frosted Designs, we are challenging you to use the word "Love" + at least one Heart on your projects.

Take note that there's a change at Frosted Designs. Instead of having a weekly challenge, we are moving into  2 challenges per month, meaning you have 2 weeks to complete your challenge.

And here's my take:

"Love" Tag

IMG_1189


For this tag, I used Sizzix, My Favourite Things dies and embossing folder. The Chevron ribbon is a gift from a dear friend.

So how do you plan to celebrate Valentine's Day?? For me, I planned with hubby to go to my current favourite tart shop, "Fruit Paradise" to eat their delicious tarts!!! Been craving for it for weeks!!!

Well, I hope you like my project. Will be quite busy for the next coming week as Chinese New Year is just next weekend. So I might disappear for a while. Busy busy visiting friends and relatives!!!

But let's not stop crafting!!! I hope to finish up one of my acrylic painting soon. Will update here once I get it done. Do join us at Frosted Designs for this fun challenge.

Thanks for dropping by.

Wednesday, January 30, 2013

"Love" Mixed Media Album

Hello all. Busy busy week for me as Chinese New Year came closer and closer. Lots of spring cleaning, shopping and preparation to do.

Today I want to share about my mini album project (part 2 assignment) for 
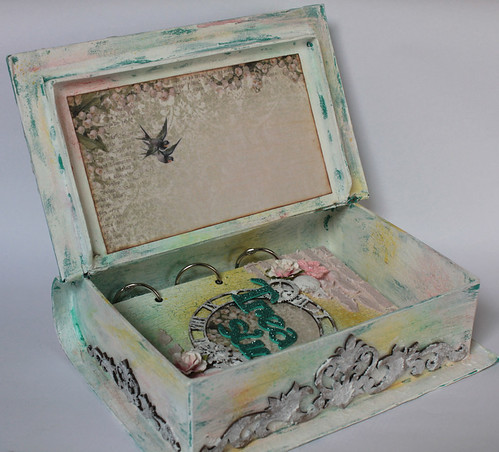
My Little Shoebox this month. I made this mixed media album with the Secret Garden collection and some from Sew Cute collection. This album is by Punky Sprouts. I love their album and I tend to want to keep them in their raw look without covering too much of it.

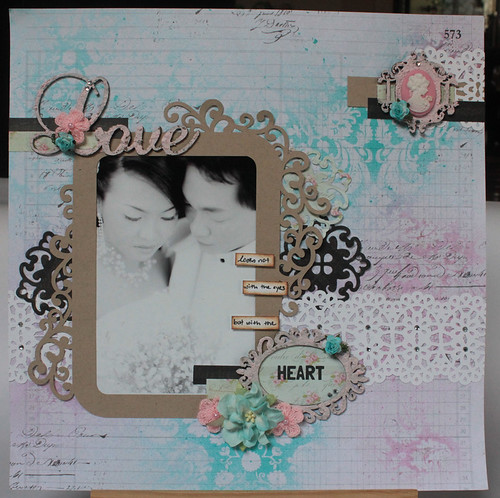
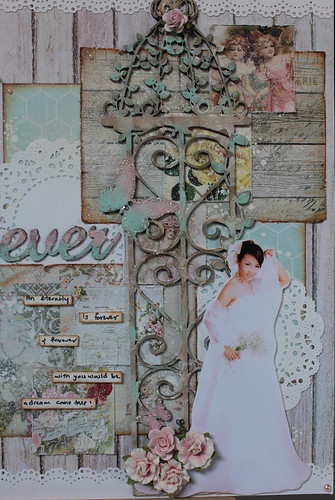
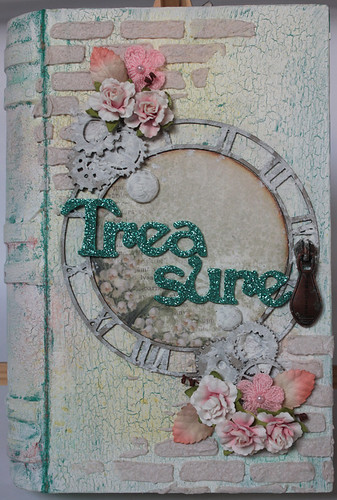
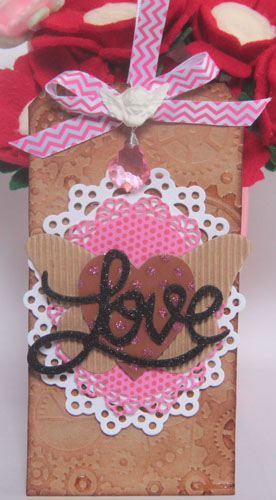
"Love Punky Sprouts" Mixed Media Album

"Love" Mixed Media Album a

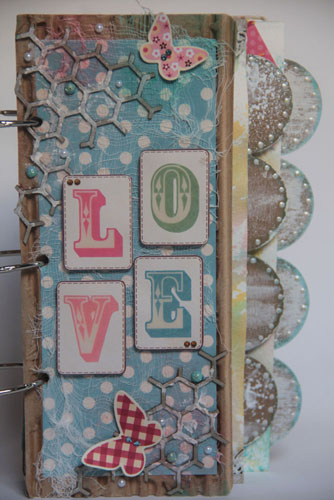
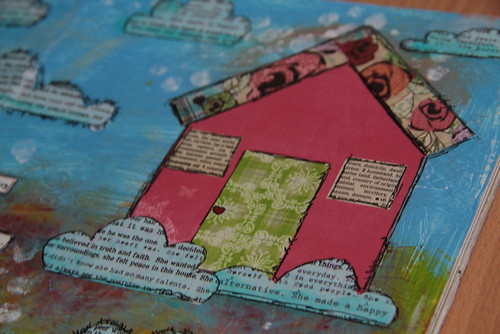
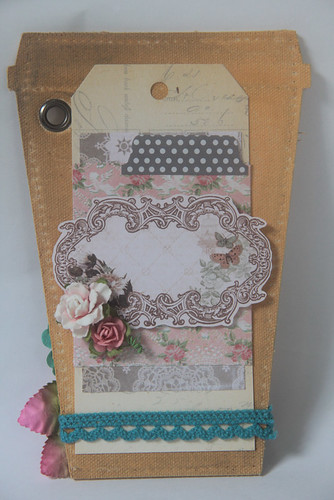
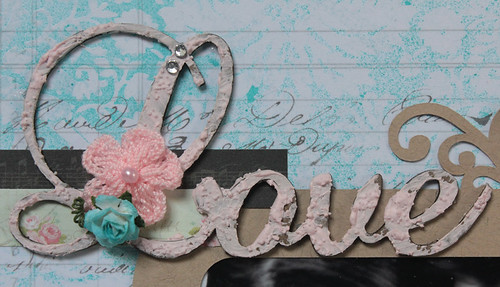
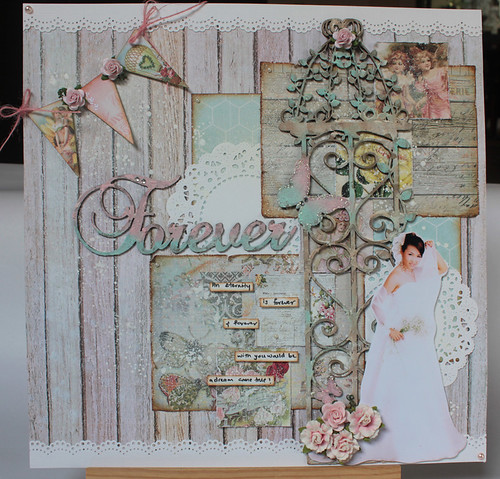
This album is dedicated to my favourite icons, images that I loved and used often. Also included my favourite colour combos, mixed media techniques. For the front cover, I tore out to reveal the corrugated part of the board. Then I adhered the paper over it and added gauze and some Dusty Attic chipboard honey comb shapes. I spread some texture paste over the chipboard shapes and misted them. For the Love title, I also added glossy accent.

"Love" Mixed Media Album b

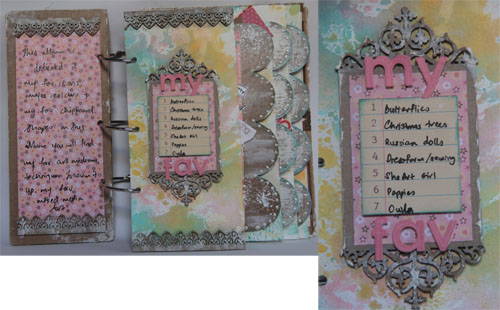
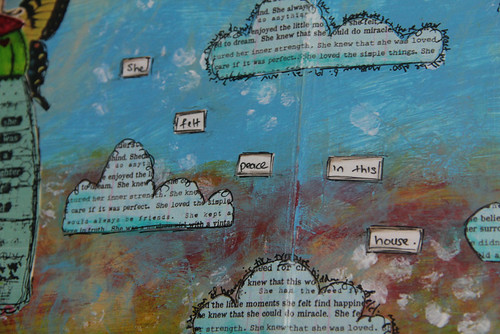
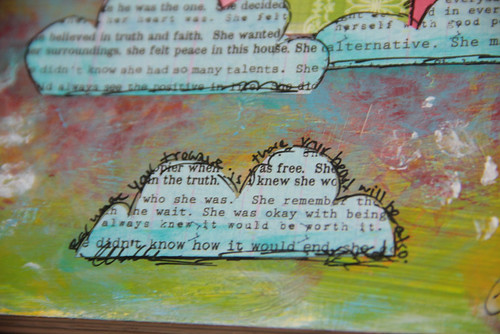
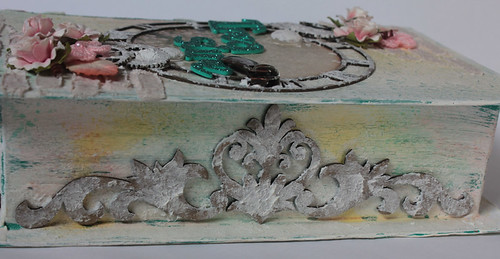
For all the mixed media paper pages in the album, I sprayed afew mists on my craft sheet and simply drag the paper through them to create the background. For the chipboard pages, I spread gesso through for the background. similarly, the chipboard shapes are done by spreading texture paste on them to create the weathered look.

"Love" Mixed Media Album c

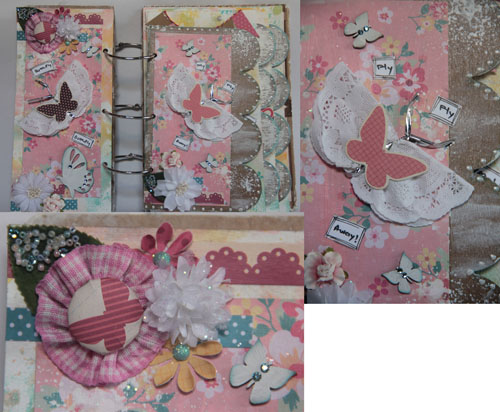
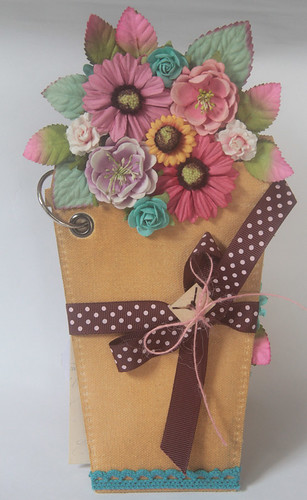
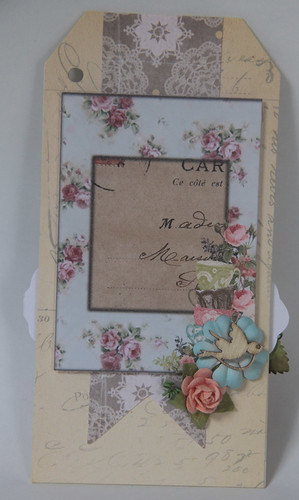
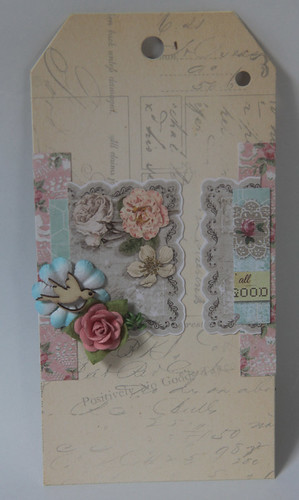
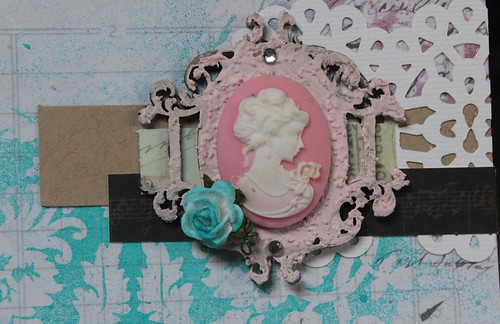
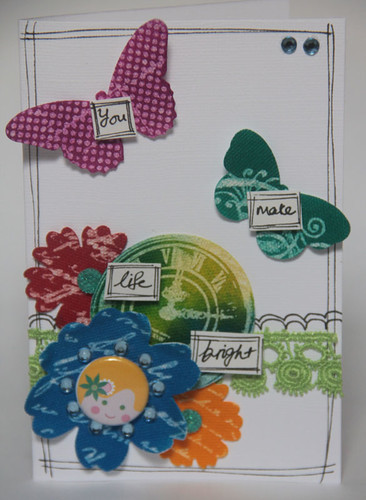
For this page, I made the butterfly folding the doily in half and tie with twist tie, then added the butterfly sticker. For the rosette, I used Itop to make the button and adhered to a trim rosette. Added seed beads to the Maya Road leaves. Painted the Dusty Attic butterfly chipboards with gesso and inked the sides with distress ink and added the swaroski crystals.

"Love" Mixed Media Album d

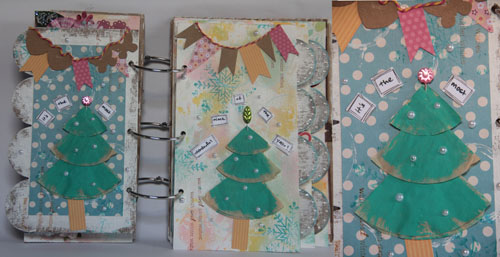
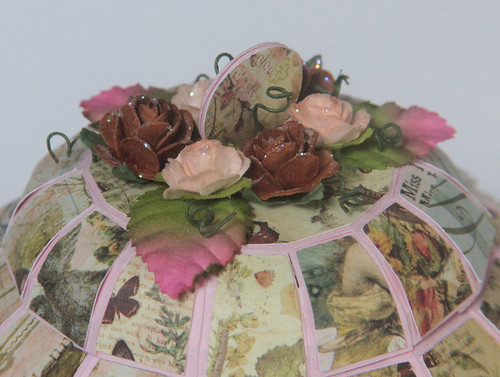
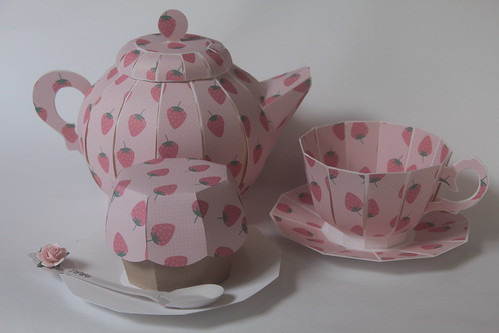
I loved trees. They gave me a calming effect. Trees always remind me of God's creativity and His loving care and His ever-presence. And I love Christmas because its Lord Jesus' birthday!! So definitely I love Christmas trees!!! I made the trees by folding the 3 sizes of cupcake liners into quarter and painting them with green acrylic paint before layering them. Added the Maya Road pins as the "star" of the Christmas trees. Made the banners with both My Little Shoebox and Maya Road banners.

"Love" Mixed Media Album e

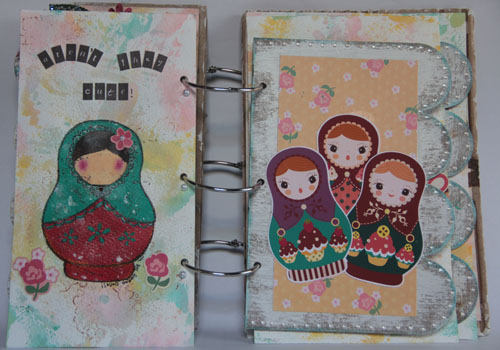
This is one of my favourite page!! I love the cuteness and roundness of Russian dolls. The doll on the right is hand drawn and painted with acrylic paints. For the face, I used a circle punch on MLS paper and painted the hair with Faber Castell Pitt Artist Pens and the face and cheek colours with Faber Castell Gelatoes. The dolls on the left are digital images.

"Love" Mixed Media Album f

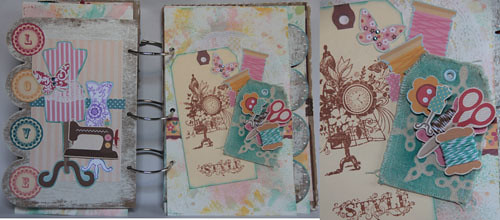
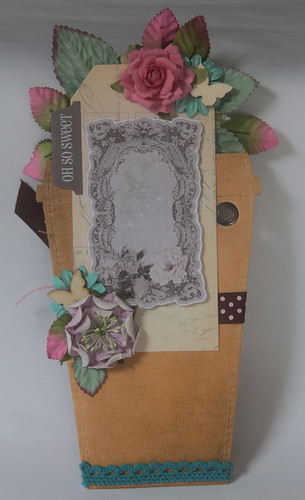
For this page, I used MLS Sew Cute collection and Prima canvas tag and stamp. Dress form is my all time favourite and weakness!!! Every time I see dress form products, I couldn't resist and end up buying them. For the canvas tag, I inked a snowflake stencil with distress ink and layered the cut elements from MLS. I added twines to the spools. The white with purple design dress form was drawn by my Silhouette Cameo. Loved the details on that dress form but it took quite a while for Cameo to draw it out.  The Love stickers are just the perfect title for this chipboard page as it fit just right on the scallop edge.

"Love" Mixed Media Album g

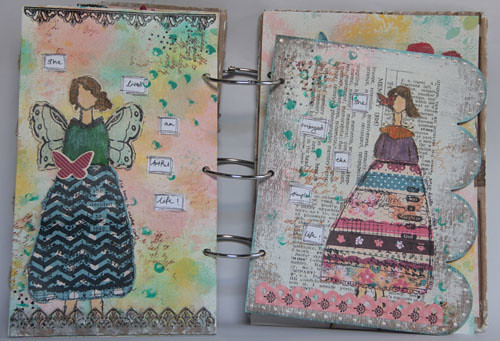
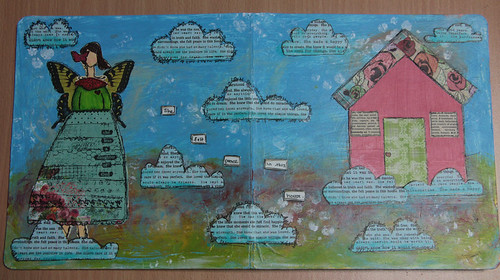
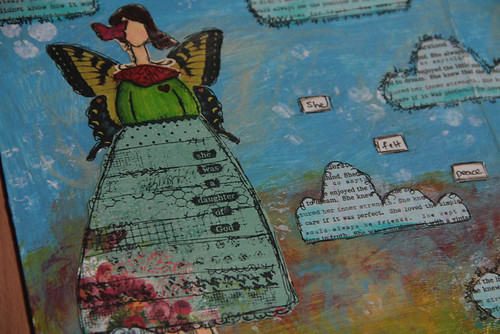
This is another favourite page. She Art girl is like the "in" thing for mixed media project now. So how could I not be mesmerized by them?? Loved Christy Tomlinson's designs!! I stamped the She Art Girls twice, on the plain MLS paper and on the patterned paper (for the skirt). Coloured the face and upper body with Faber Castell Big Brush Pens and Pitt Artist Pens and Gelatoes.

"Love" Mixed Media Album h

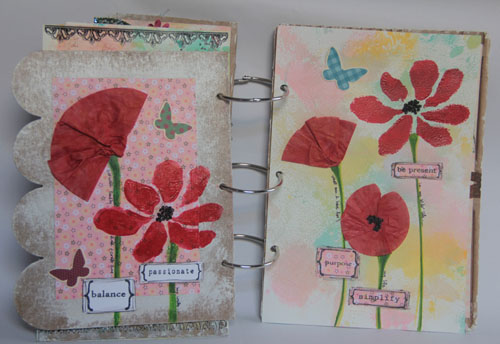
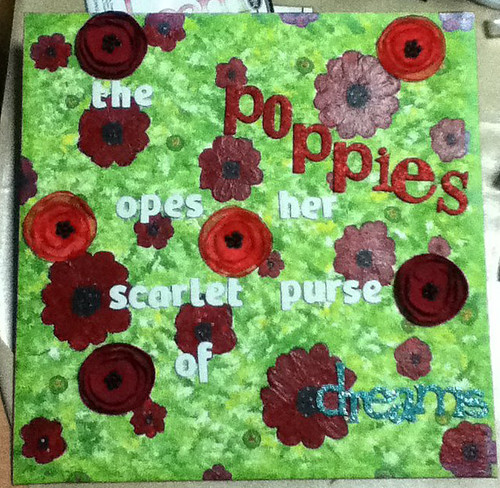
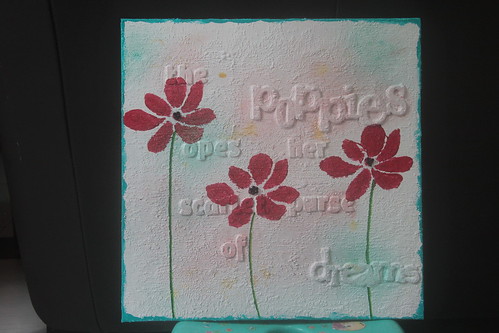
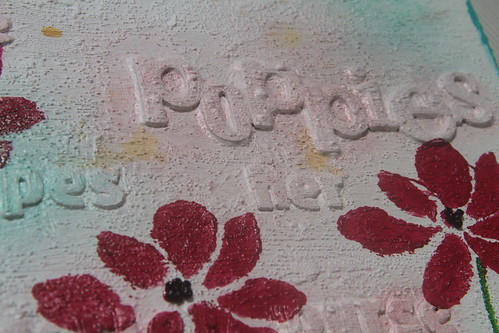
This is my top favourite page for this album!! Not only do I love poppies like Donna Downey, I also love the labels on each poppy. Those are stamped with Christy Tomlinson's My Living Canvas stamps. I also jounal on the side of each stalk the things I want to achieve or take note for each label. This is like a life's journal to me. To create the poppies, I painted the cupcale liners with Faber Castell Big Brush Pens and added water to spread the colour, then fold in half and crumbled them. For the stamped poppies, I used Donna Downey foam stamp with acrylic paint and also added black beads to the flower center.

"Love" Mixed Media Album i

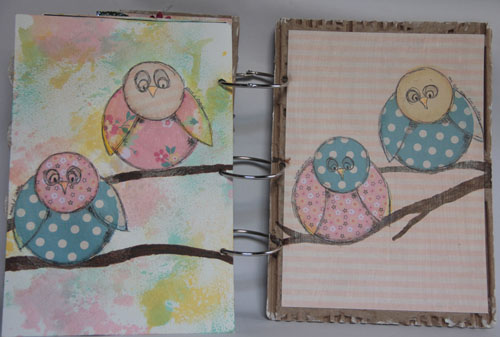
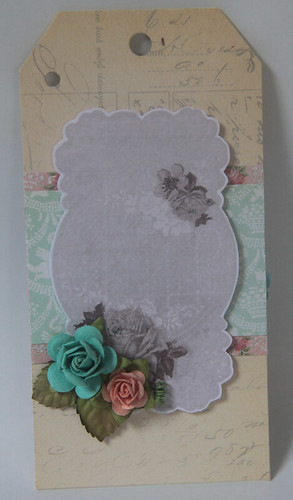
For this last page, it seems like an unfinished page. I wanted to do more journalling all over the page in the first place.  But after staring at it for few days, decided to leave the background blank. I might add to it in the later months. But for now, its a finished page to me. Not sure you recognise the species but these are owls!! My hubby said it look like birds. ha ha...These owls are done by layering two sizes of circle punch-outs. Drew the branches with Faber Castell Pitt Artist Pens.

Well, this is a long post. Hope you haven't fall asleep. :)

Do try your hands on mixed media. It's fun and addictive and also therapeutic. It really take the stress out of me.

Thats all for today. Have tons of fun. Thanks for dropping by. Do check out my 4th Blog Candy.