Thursday, August 13, 2015

Part 2 - "The Repair Shop"

Hi, this is part 2 of my sharing on my miniature repair shop. Today I want to share how I do the tool boxes and some of the small details of the shop.


Pardon the mess on my table. >.< There's 2 boxes under the table for this shop. One is a tool box and the other a crate. Both are made from kraft paper and a thin cardboard. Here's the 2 templates before assemble:

For this tool box, I inserted and adhered a toothpick into the 2 holes I poke on the tall sides of box.


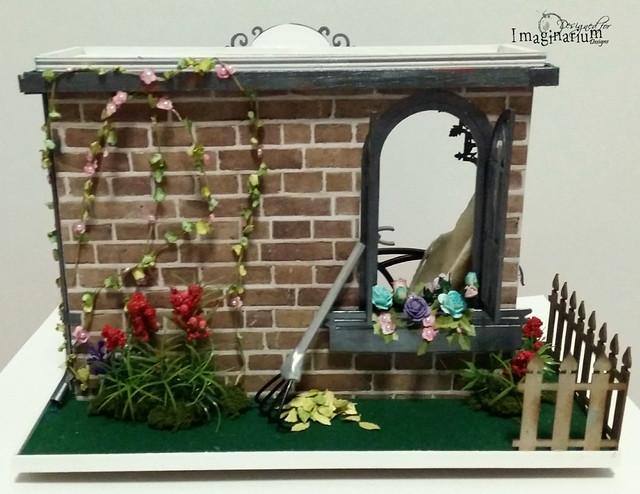
Here's the back of the shop:

"The Repair Shop"

"The Repair Shop"
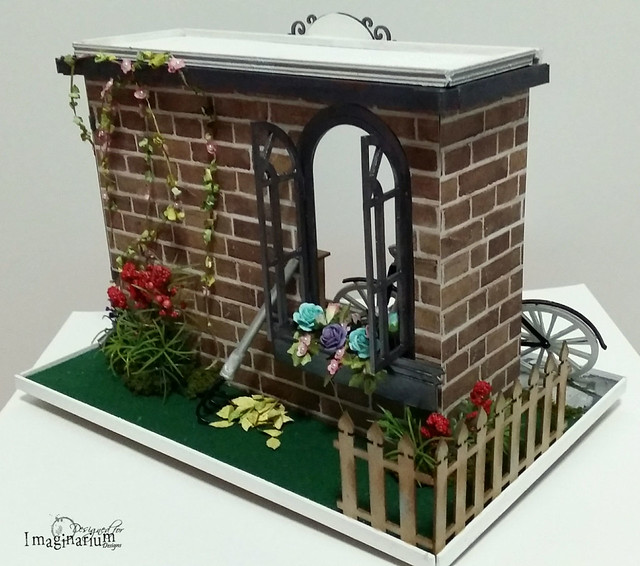
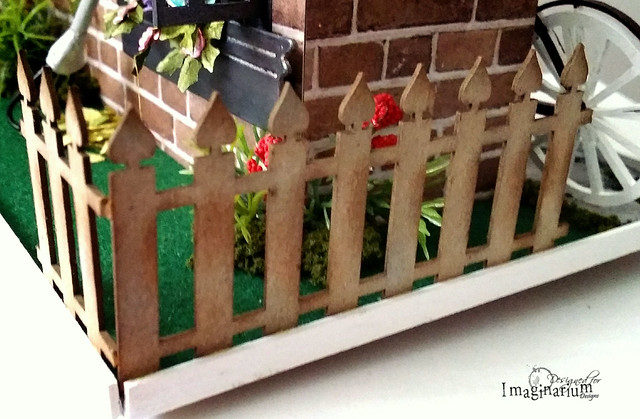
For the chipboard spade top picket fence, I left it raw and only rub some distress ink over to dirty it. For the wooden base, I cut and painted strips of wood over the edge to have a finished look and also to support the fence.

For the top of the shop, I added strips of painted white decorative wood strips to give a finished look too.

"The Repair Shop"

"The Repair Shop"
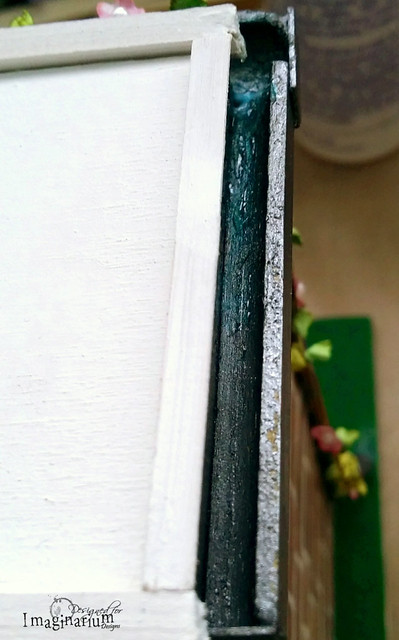
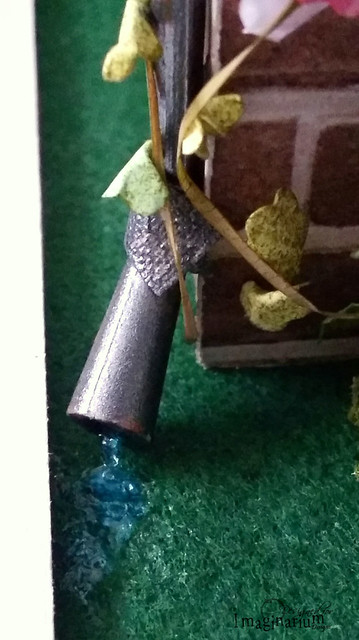
Under the decorative lining, I added a gutter and a pipe with "real" water. The gutter is made with strips of wood and paper strips and colored with Viva Decor Inka Gold-Graphite. For the pipe, I used a round wood strip and a small part that I break out from a stick (not sure its for tying balloon or lolly pop).


This is the part (circled) that I break out and used for the bottom of pipe. I colored it with Viva Decor Inka Gold-Graphite then glued and covered the joining part with a fabric tape(also colored with the Viva Decor Inka Gold). Then I squeezed out some Woodlands Scenic Water Effects into the gutter and the end of the pipe and unto the felt floor. The Water Effects dry transparent. So I painted over with blue Shimmerz Paint Spritz to make it more realistic.

That's all for today's sharing. Tomorrow I will share on making the vines, flowers, pile of leaves, rake and aprons (in the shop).

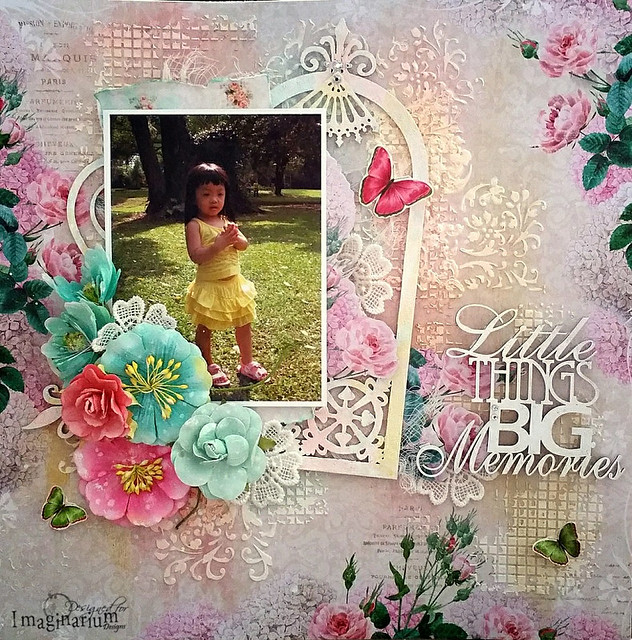
Do hop over to Imaginarium Designs and leave a comment to win a pack of chipboards and have a look at more complete pictures of my project.

Thanks for dropping by.

Wednesday, August 12, 2015

Imaginarium Designs - Off The Page Project

Hi, today I want to share a Off The Page project that I made for Imaginarium Designs. Due to the many tutorials and details of this project, I will be splitting and sharing afew posts on this project over the next few days.

"The Repair Shop"

"The Repair Shop"

Inspired greatly by the chipboard windows, bicycles and the gears, I made a miniature repair shop. Today I will share on how to make the base and main body of shop.

Used a wood board for the base. I mask off the rest of the area with masking tape. Then cover a portion of the board with texture paste over a stencil. Heat dry.

Paint over it with acrylic paint to create the stone pavement.

 Then I cover the rest of board with a green felt as grass patch.

Adhered some moss randomly.


I used a S$2 Daiso white wooden box (that's hollow base) for the main body of shop. Then I cut a piece of cardboard, cover with patterned paper and cut out the space for the chipboard windows and adhere to the box. After which I cover the sides with brick patterned papers.


For the floor in the shop, I scored strips of kraft papers, rub over with graphite Viva Decor Inka Gold, then arranged and adhered down to floor. Note that I added a thin strip of wood to widen the floor space abit (painted the wood strip white before adhere).


For the chipboard windows, gears, corners, frames and the diecut tools (glued about 7 layers of diecut kraft papers), I colored them with Viva Decor Inka Gold-Graphite, Silver and Bronze.

I made the table from wood sheet and strips and wooden decorative legs and inked randomly with distress ink to give it a dirty look. For the peg board, I cut from a foam sheet, used piercer to poke holes and twist wires around the tools to hang them on the peg board. And they can be removed easily. I made the kraft tool boxes (below the table) from scratch too.

Here's some pictures of the miniature shop:

"The Repair Shop"

"The Repair Shop"

"The Repair Shop"
For the chipboard bicycles, I painted them white, then go over certain parts with Sharpie pens and added black half pearls at centre of wheel.

For more pictures of the whole shop, do hop over to Imaginarium Designs to have a look. I will be sharing more picture tutorials and details of this miniature shop in the next few days. Do stay tuned.

Here's the chipboards I used for the miniature shop:


(Used both big and small bicycles)


If you are interested to buy these yummy chipboards, do go over to Seriously Scrapbooking to get them.

Do hop over to Imaginarium Designs to look at more pictures of my project. And do leave a comment to win a pack of chipboards. Have fun. Thanks for dropping by.

Tuesday, August 11, 2015

"Baby Of Heaven" Layout

Hi, everyone. Today I want to share another layout I made using the mood board and sketch from Off The Rails Scrapbooking.

"Baby Of Heaven"

"Baby Of Heaven" Layout

Made this layout of my boy when he was still a baby. Love his tiny feet. And love his chubby cheeks. I miss planting tons of kisses on his adorable feet. And miss the sweet baby smell. LOL.

"Baby Of Heaven" Layout

For more details, do hop over to Off The Rails Scrapbooking. And do join us in our August challenge and stand a chance to win a pack of yummy goodies from our sponsor, Graphic 45.

Have fun.

Thanks for dropping by.

Tuesday, August 4, 2015

Off The Rails Scrapbooking - August Mood Board and Sketch Challenge

Hi, its time for another mood board and sketch challenge over at Off The Rails Scrapbooking. Here's the mood board and sketch:


And this month's sponsor is Graphic 45. Look at the awesome prize:

And here's my interpretation of the mood board and sketch:

"Tea" Layout

"Tea" Layout

These photos of my boy were taken at our Cameron Highlands trip few years back. Love these photos taken by my talented baby brother. This layout was rushed out within 2 hours in between church and a birthday party. Its not everyday and everytime I'm so "efficient" and without prior planning. LOL.. sometimes I amaze myself. :P

For the background, I cover the whole page with clear gesso then glue randomly with Tim Holtz tissue wrap that I tore out. I spread texture paste over a stencil and brush over with green, yellow and aqua mists.

I stamped and diecut the seed packets from PTI die and stamp and distress the edges with Tea Dye distress ink. Stamped the word "Tea" on them. Also stamped 4 stamps with Graphic 45 Botanical Tea stamp set and colored in with Faber Castell Pitt Artist Pens. Die cut some leaves and added to page. Stamped and cut out 2 flourish circles too. After adhere all down, I added some ephemera and rubon flourishes too. Lastly doodle the 4 sides outline with black pen.

"Tea" Layout

I hope you are inspired by my sharing. Do hop over to Off The Rails Scrapbooking and join in our challenge. I'm drooling over the prize myself. Hee..

Have fun. Thanks for dropping by.

Thursday, July 23, 2015

Shabby Chic Projects

Hi, everyone. I'm back today to share 2 projects that I made for Imaginarium Designs, a shabby chic layout and a mini album. Life have been "busy" lately due to my health. But now I'm recovered and I hope to start my crafting engine soon. :)

I have a step by step tutorial on Imaginarium Designs blog for this layout. Please do hop over to their blog to have a detailed look and leave a comment to stand a chance to win a pack of chipboards.

"Little Things Big Memories"

"Little Things Big Memories" Layout

I love pastel colors and this color palette: pastel pink, yellow, teal, white is by far my all time favourite. For this layout I used Lemoncraft paper collection. Love their papers. For the Imaginarium Designs chipboards, I gesso them and added pastel colors too (except for title that I left it white).

"Time Creates Wonderful Memories" Mini Album

"Time Creates Wonderful Memories" Album

For this mini album I used Websters Page paper collection for entire album and Top Dog camera die. For the chipboards, i gesso them and added tint of teal. For title, I used Viva Decor Inka Gold. Loved the chipboard clocks (I used the big and tiny one). They really suit the title " Time". Wanted to adhere photos of me and my hubby from courtship time to now. But gosh... 10 years of photots to go through and chose. A big project. LOL

Here's the chipboards I have used:


Hope you enjoy my sharing today. Do hop over to Imaginarium Designs and leave a comment. Have fun crafting. 

Thanks for dropping by.


Sunday, July 12, 2015

"B is for Brother & Best Friend" Layout

Hi, its been a few weeks since I blog. Health have not been good lately. Taking a "break" now (by force). And slowly blogging this post with my half closed eye. LOL.. Oh I miss crafting. Ok. Today I want to share a layout I did for Imaginarium Designs. The theme is Words & Phrases.

"B is for Brother & Best Friend"

"B is for Brother & Best Friend" Layout

For this layout, I used some colorful project life cards. Used the sentiments from the cards and the stickers to form phrases that matches the title and photos.  Love these cute photos of my kids. And if you look closely both have drop their front teeth. LOL. And how clever of them to use the back storage of car as extra seat. Just nice to fit my boy's bum. Cheeky mum!!!

"B is for Brother & Best Friend" Layout

For the "traffic lights" chipboard, its a negative from the small clock face chipboard sheet. I simply paint it light brown and add patterned papers behind. For the title chipboard, I painted the B mint green to make it pop and added enamel dots with traffic light colors.

"B is for Brother & Best Friend" Layout

I painted the starburst chipboard yellow to resemble sun. Love how sunny and funny my kids look when they play together.

"B is for Brother & Best Friend" Layout

And here's the Imaginarium Designs chipboards I used:

Used the negative as traffic light.


I hope you enjoy my projects. And pray that I can recover fast and start crafting. Oh... how I miss the fun of getting my hands dirty. LOL.

Have fun. Don't forget to hop over to Imaginarium Designs to look at what my team mates have done and do leave a comment to stand a chance to win a pack of chipboards.

Thanks for dropping by.