Wednesday, June 4, 2014

Wedding Shadow Boxes

Hi, friends. The past May 2014 is a busy yet joyous month for me. My brother got married at end of May. So I have been busy helping him make stuff for his wedding. Thoroughly enjoy it. :)

I have been so busy making the stuff that I forgot to take better and clearer pictures of them before his wedding. But here's some (not so good) pictures of them. :P

Wedding Shadow boxes
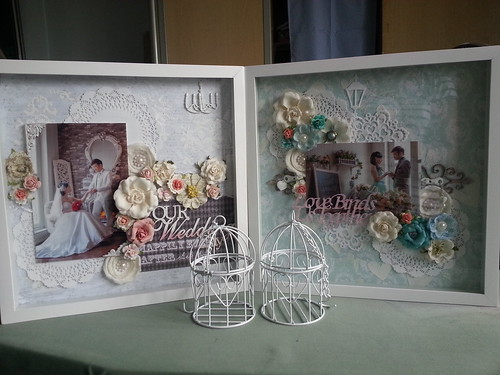
Wedding Shadow Boxes

Made these 2 shadow boxes as my wedding gifts for him. Hope he and his bride will love them.  Here you can see the undecorated birdcages that I got from a local shop, Daiso.
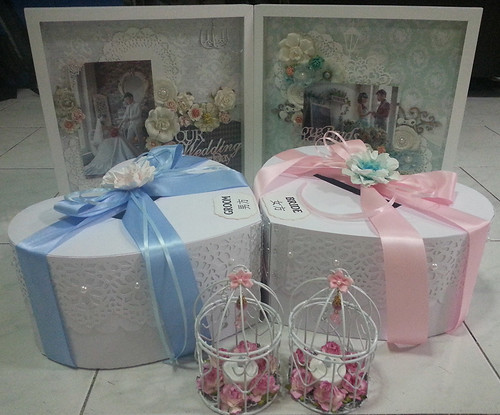
Wedding stuff

Made wedding red packet boxes for his guests to drop in their love gift. Made the box from scratch by using my Silhouette Cameo to cut out papers, then trace over thin and thick chipboards/cardboards and assemble together. Added pearls and crystal trim. Made the big flowers from scratch with Bazzil cardstocks and distress inks and flower punches.
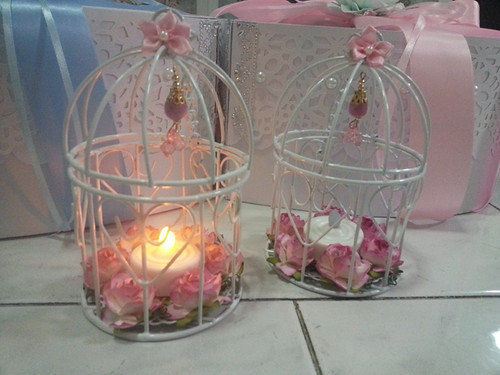
Wedding stuff

The decorated birdcages in detail. Added diecut doilies at bottom so the flowers can be adhered down (the birdcage did not have solid base). Used Prima embellishment as the dangling part. The battery operated candle is perfect to add the final romantic touch. Now these birdcages are in my brother's room to add a feminine touch to it. :)

Love my brother. Pray that God will bless him and his bride as they walk hand in hand together towards their future ahead.

Thanks for dropping by. Have fun creating!!

Friday, May 16, 2014

Off The Rails Scrapbooking - Chipboards

Hi, its time for another challenge at Off The Rails Scrapbooking. This round we are challenging you to use chipboards in your projects. I love love chipboards!! So needless to say, I absolutely enjoy creating this time. And here's what I made:

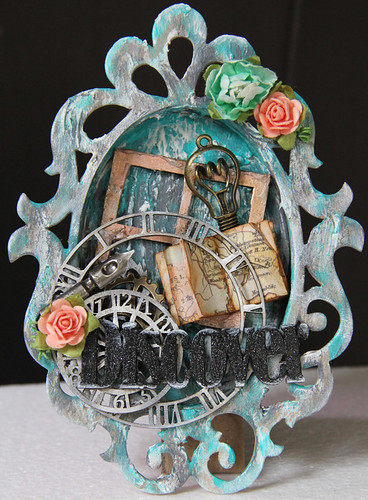
"Discover" Chipboard Frame

OTR Chipboard challenge

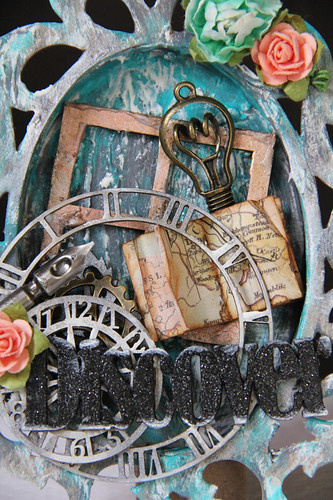
Created a chipboard "shadow box" frame from chipboard using Sizzix die. For this project, I really want to thank my dear owl friends who gave me ideas on what to include in the theme "Discover". Used their ideas of map, window, book. Its really good to have friends who are ever ready to offer their help especially in times when I lacked mojo or ideas.

I added texture paste, paints and white chalk ink over the frame. To make my job easier, I used the color scheme I found at Pinterest.


I use the same techinique on the chipboard window.I randomly painted the chipboard clocks and gears with metallic paints. For the chipboard word, Discover, I paint with black acrylic paint and added Folkart black glitter paint too. Then inked abit with white chalk ink. 


OTR Chipboard challenge

I cut and stapled the Pink Paislee map papers into a mini map book and inked with distress inks.

OTR Chipboard challenge

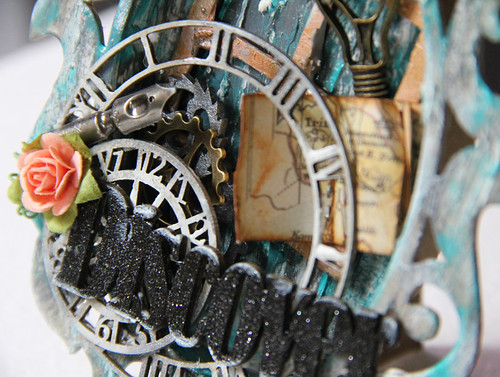
From this angle, you can see the gears "hidden" behind the clocks. I used 2 chipboard gears and a metal gear.

OTR Chipboard challenge

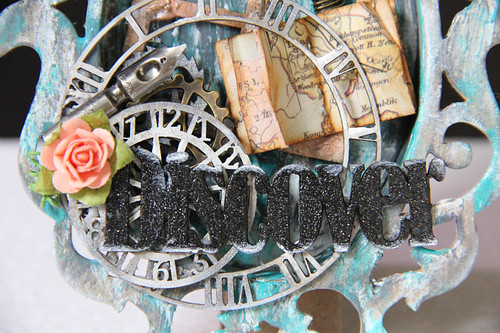
The Tim Holtz pen nib is the perfect touch to the Discover theme. Been holding on to it for quite some time. And to add abit of feminine touch, I added Prima flowers. Love this frame. Small enough to not occupy too much space yet can "squeeze" in quite abit of elements.

I hope you all enjoy this project. Do hop on over to Off The Rails Scrapbooking to join in the challenge. And do join in my Blog Candy here too.

Thanks for visiting my blog.

Sunday, April 20, 2014

OTR Challenge - Sketch and Color Palette Challenge Part 2

Hi hi. Happy Easter Day. Thanks for all who come back to my blog for the last of the 3 layouts that I shared on Friday. For those who just drop by for first time, you might want to take a look at my previous post.

For this round at Off The Rails Scrapbooking, we invite you to join us for a sketch and color palette challenge.


Now for the last layout of my girl.

"Little Girl"


Those who know my girl would agree with me that she is such a shy and quiet girl. When she's in nursery class, her teacher commented that she hasn't heard her voice for one whole year. That's how quiet she is when she's not with us. She had social phobia when young and would freeze up when there's strangers around. Her whole body would literally froze. This photo of her is one of the rare ones that she laughed so openly when outside. And I always love her sweet smile.


I used Echo Park papers and stickers for this layout and the Simple Stories bingo cards.


For the background I used chalk inks to rub over a stencil. And added crystals randomly. Used the Echo Park sticker for the title.


You can see that for this layout, I created a spring garden look to complement the picture. I loved flowers and pastel colors.

Well, I hope you are inspired by my projects. Do join us for this challenge. And do drop by here for my 5th blog candy giveaway.

Thanks for visiting my blog. Have a blessed week.

Friday, April 18, 2014

OTR challenge - Sketch and Color Palette

Hi, all. Once again, its time for another challenge by Off The Rails Scrapbooking. This round we are having a sketch and color palette (inks, paints etc) challenge. Oh boy!! I love love the colors and the sketch. Without further ado, here they are:


Aren't the sketch and colors lovely? I'm so inspired by them that I made 3 layouts from it. Today I will be showing 2 of them. Do drop by on Sunday for the last layout.

I made the first layout for our trip to Malacca. Love this picture as my kids' expressions are so cute!! I have scrapped a similar picture before.

"Enjoy The Moments.."


I used texture paste and stencil to create the background texture. Painted the chipboards title, borders and shapes.


I also added some texture paste onto the chipboard title, put a layer of gauze below and sprayed mists over randomly.


The chipboard frame over the picture is actually the negative of the honeycomb chipboard shapes in the background. I simply paint over and adhered instead of throw away.


Heres a closeup of the texture paste background. Painted the 2 butterflies and adhered crystals on the body.

After doing the first layout, I decided to make one layout each for my kids.

"Hello Summer"


How adorable is my son in his younger days. :P

I used watercolor to paint the background, creating a ocean look. Used Simple Stories stickers and papers too. Its so simple and easy to create a quick layout with Simple Stories stickers.


I added sequins too and stamped the 2 hexagon quotes and pop them up with 3D dots.


A closeup view of my adorable chubby son. ha ha... This is one of my favourite pictures of him. The Simple Stories bingo cards are perfect journaling.


I die cut the word, hello and added the Simple Stories "summer" sticker as the title.

Thats all for my sharing today. Thanks for bearing with my long post. Please do check out my last layout and the rest of our DT projects on Sunday at Off The Rails Scrapbooking.

Do join us in the challenge over at Off The Rails Scrapbooking. By the way, do you all know Off The Rails Scrapbooking also have a card challenge other than the usual challenge? Do drop by the current cards challenge and join in the fun.

Have a blessed Good Friday and Easter weekend. God bless.

Thanks for visiting my blog.

Sunday, March 23, 2014

Off The Rails Scrapbooking - Anything Goes Challenge

Hi, friends. Here I am again. Now at Off The Rails Scrapbooking, we are having the "Anything Goes" challenge. Meaning no restrictions on you for this challenge. You can create anything you like. The important thing is for you all to have fun. And this round, the prize will be something different. The winner will receive a Designer Hot Spot. This means you get to share your blog and designs with us.

And here's what I created:

"Friends Always" Wood Decor


I painted a raw wood piece with acrylic paint, stamped with script background stamp and spread fiber paste over a stencil to create the background look. Then I simply add the raw chipboard words, flowers and butterflies. Its such a simple and fast project. And a great home decor piece to gift to your family or friends.

Here's some closeup details:


I love chipboard shapes and words. They are so useful in creating last minute gifts. You can leave it raw or paint, glitter them etc.


Butterflies are my other favourites too. I added the white butterflies on the front while the 3 blue ones are adhered at the back and covered with felt (to secure and cover the wires).

I hope you love my project. Do hop over to Off The Rails Scrapbooking to join in the fun.

Thanks for visiting.

Friday, March 14, 2014

Off The Rails Scrapbooking Blog Hop


Hi, friends. Welcome to Off The Rails Scrapbooking first blog hop. You might have come from Diana Rivero Gonzalez's blog. If not, please refer to the full list below and start from Off The Rails Scrapbooking.

This blog hop is about our favourite embellishments.And here's what you need to do.
1) Create a layout using 4 of the Design Team's favourite embellishments and link it to Off The Rails Scrapbooking Blog
2) Make sure you mentioned the 4 embellishments that you are using and from whose DT's blog you got from
3) Must follow both Off the Rails Scrapbooking blog and all DT blog
4) Comment on my post and also on Off The Rails Scrapbooking blog to let us know you have finished the blog hop

Before I share my work, let's look at the fabulous prize sponsored by:

Graphic 45 is an award-winning scrapbook and paper crafting company. We offer vintage inspired crafting products that capture the flamboyant style of the 1920's and 30's - with vibrant color, irresistible texture and imaginative design to create products with decades-old appeal that's both fresh and familiar. Let our products inspire your next scrapbook layout, card, album or home decor project.

And here's the awesome prize:

The above photo is the prize and it is By The Sea range and it consists of the following
1x 12x12 Pad
1x 8x8 Pad
1x stickers
1x die cuts
1x chipboard

Here's my project:


Made this layout for my girl's ballet concert. We really love this photo of her. And as parents, we are so so proud of her.

To match and draw your eyes to the photo, I used a soft pastel palette of papers. You might wonder what lovely papers I used. Its my favourite Tilda papers. Added the raw chipboards and Prima leaves and flowers. Randomly adhered pearls around the layout.


Loved this cluster of flowers and here's my little girl in the "China Doll" costume.


And this is my favourite go-to embellishments: Chipboard Shapes

Now you are to hop to Gayle Gordon's blog.

Have fun crafting.

The full list of Blog Hop:
1. Off the Rails Scrapbooking http://offtherailsscrapbooking.blogspot.com/
2. Narelle Fasulo -www.enchantedcreationsnf.blogspot.com.au 
3. Deena Otway -http://deezignerpapercraft.blogspot.com.au/
4. Erin Manz Reed -http://scraps-of-reflections.blogspot.com.au/
5. Diana Rivero Gonzalez  -http://itsmylifeandimscrappingit.blogspot.com/
6. Carol Theng  - www.carolpaperie.blogspot.sg
7. Gayle Gordon  - http://www.baggiesplace.blogspot.com.au/
8. Fiona Paltridge  -http://pastichescrapbookstudio.blogspot.com.au/2014/03/off-rails-blog-hop.html
9. Felicity Wislon - http://herhand.blogspot.com.au/
10. Sue Plumb - http://soupie75.blogspot.com.au/
11. Rose Andrew  - http://www.cardsforallreason.blogspot.com

12. Jelissa Mei - http://jelibeanz.blogspot.com.au/
13. Wendy O'Keeffe -http://scrapbookingandmixedmediabywendy.blogspot.com.au/
13. Catie Kennedy - www.catiescraftcorner.blogspot.com.au/


Thanks for visiting.

Saturday, February 22, 2014

Off The Rails Scrapbooking Challenge "Create An Embellishment"

Hi. Its time for another challenge at Off The Rails Scrapbooking. This round, we are challenging you to make your own embellishments, be it flowers, tags etc and use it on your projects. And here's what I made.

"Love" Layout


Recently I venture into crocheting and watercolor. So I use watercolor to extend the scenery of the photo. To make it less obvious, I printed my photo unto Bazzill white cardstock and a canvas-like photo was the result. I'm still practising on the watercoloring effects so my skill is still mediocre.

Thanks to my teacher, Waisam, I learnt crocheting amigurumi. First time crocheting alphas, I had no idea whether I done it right. But still I like the results. :) Crocheted the title and glued rosette trims on die-cut heart chipboard. Made the key with Martha Stewart clay and a key mold and twine some leftover yarn around. Diecut the small hearts and watercolored the edges.

Here's more details:


The canvas-like photo.


I find this quote quite appropriate to use. And I love the meaning. This photo was taken to celebrate Valentine's Day. And its more precious to us as its taken by my 9 yrs old girl (first time holding a camera). I find it well taken. Maybe I'm biased. ha ha...


I got alot of projects that I made. But due to my migraines and laziness (got to admit this... :P), I have not been blogging about them. I hope to schedule them as soon as my migraine goes away and I can take pictures of them. God, please heal me and take away the migraine pain!!!!!

In meantime, do drop by Off The Rails Scrapbooking to join in this challenge.  Have fun.

Thanks for dropping by. See you soon.